The Vibrating Floor

 
IMG_0312.jpg

Pretty much since I started working at Three Ways School, nearly ten years ago now, I have had my eye on a cavity which was built into the Sensory Studio floor. It was pretty much sealed in and over the years I have done investigations and tried to get hold of missing plans etc to find out what is down there. Over the last couple of years I started work in earnest and got some budget to create a vibrating floor.

Having come up with a rough design I set about trying to find a carpenter willing to take on the project. Once I had detailed my requirements, mostly I found that the carpenters stopped returning my emails and answering my calls. However, Andy Emmerson (Emmerson of Bath) was made of sterner stuff and agreed to take on the build.

We built a floating floor mounted on rubber supports and powered by two powerful shaker motors. These motors can be driven with low frequency audio meaning you can feel music with very limited audible sound. Andy did a great job on the frame, there are no rattles and the floor moves freely for a great responsive and very powerful vibration.

I am currently working on a suite of tools for using vibration effects with SEN children and will eventually link the visual floor projection with the underlying vibration events.

Puzzles for the visually impaired

It may have been a little quiet around the blog lately, in part due to the fact that I now have access to a laser cutter and have been lasering everything I can get my hands on.

A teacher at Three Ways School was asking about simple puzzles of limited pieces and it got me thinking about puzzles for the visually impaired. After a simple prototype I made an 8 piece puzzle with a raised pattern on one side and each tab being a different shape. I ran off 5 of them which are out with classes being tested right now.


A first look at the BBC micro:bit

We received some of these cute little ARM based boards aimed at helping teach STEM to Year 7 children. They are really easy to use with a variety of coding environments and are great fun, but can do some pretty serious stuff too. The ring pin outputs are good for croc clips, banana plugs and conductive thread and you can access the other pins with an external edge connector. 

image.jpg

It has an accelerometer, a compass and BLE and the coding environment has a great simulator for testing your programmes before you upload. 

image.jpg

I will report back when I have done some more playing...

Designing electronic instruments - 2

Following on from this post.

On Monday we met to discuss the first prototypes of the two instruments we wanted to explore as detailed in the previous post. 

The Filter Box

We took a look at the first Filter Box prototype as seen in the pictures below which was set-up in a temporary box for testing of the sensors. I bought several small wooden boxes to try for size, shape, and general ergonomic-ness when holding, and to enable discussions as to what might be good features and functionality to have in the box. 

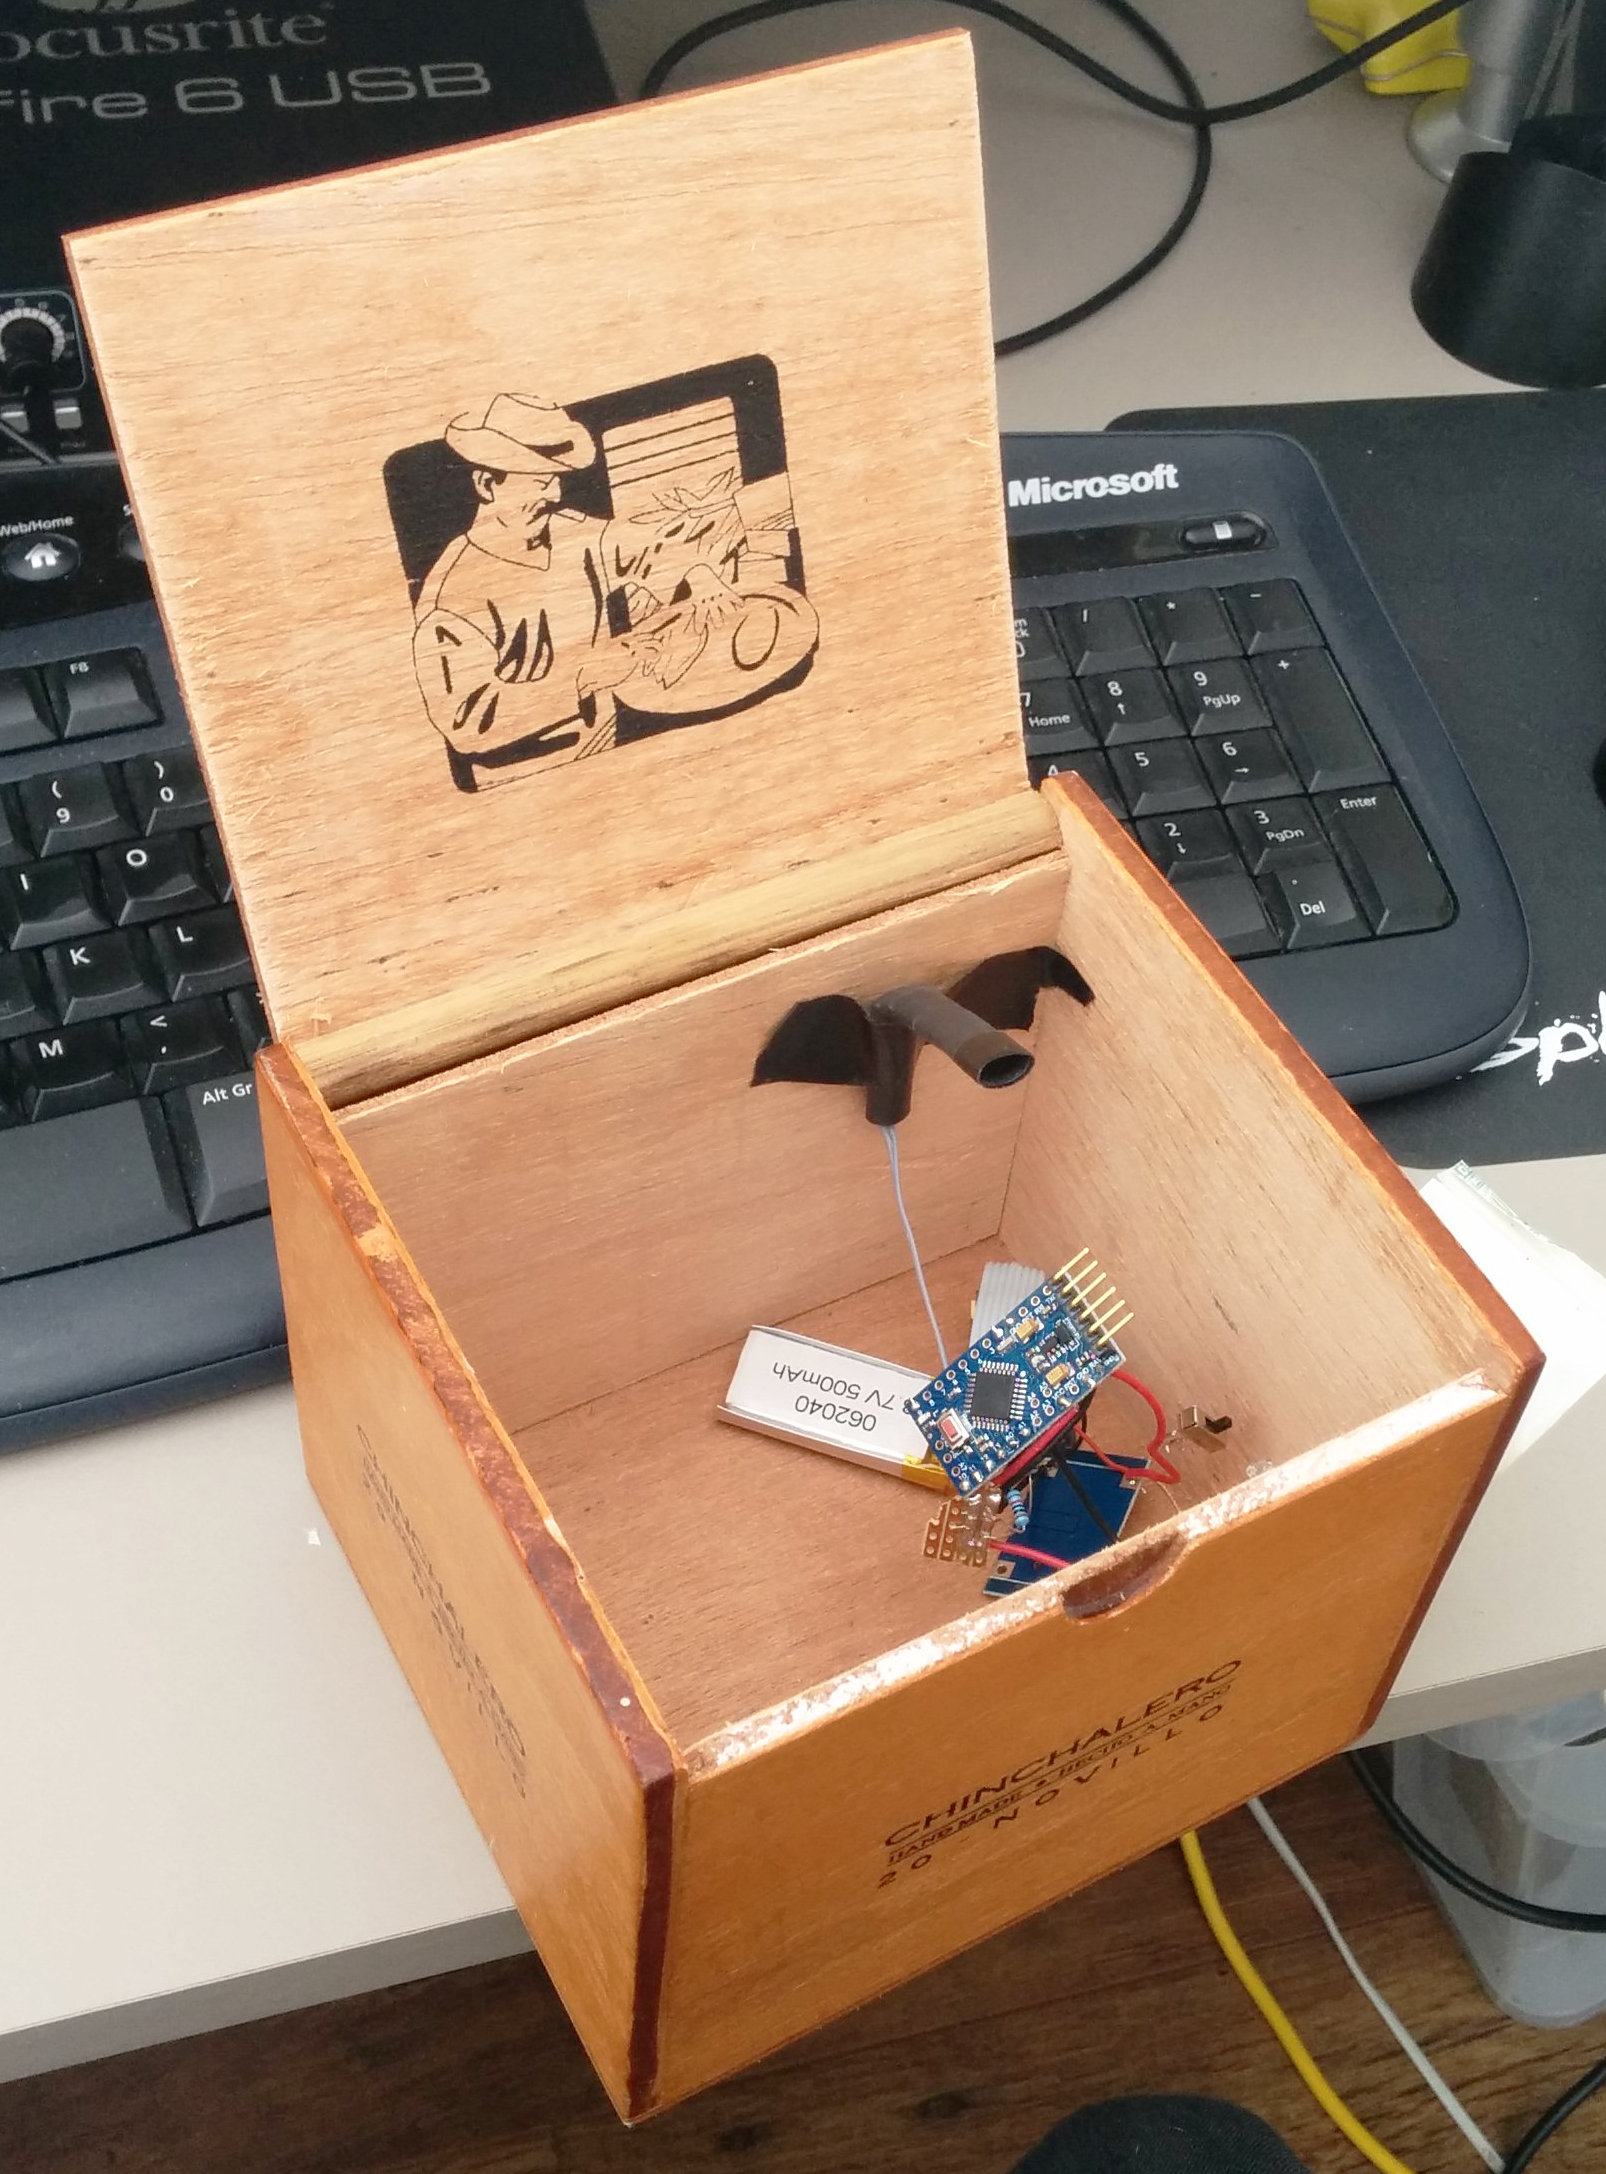
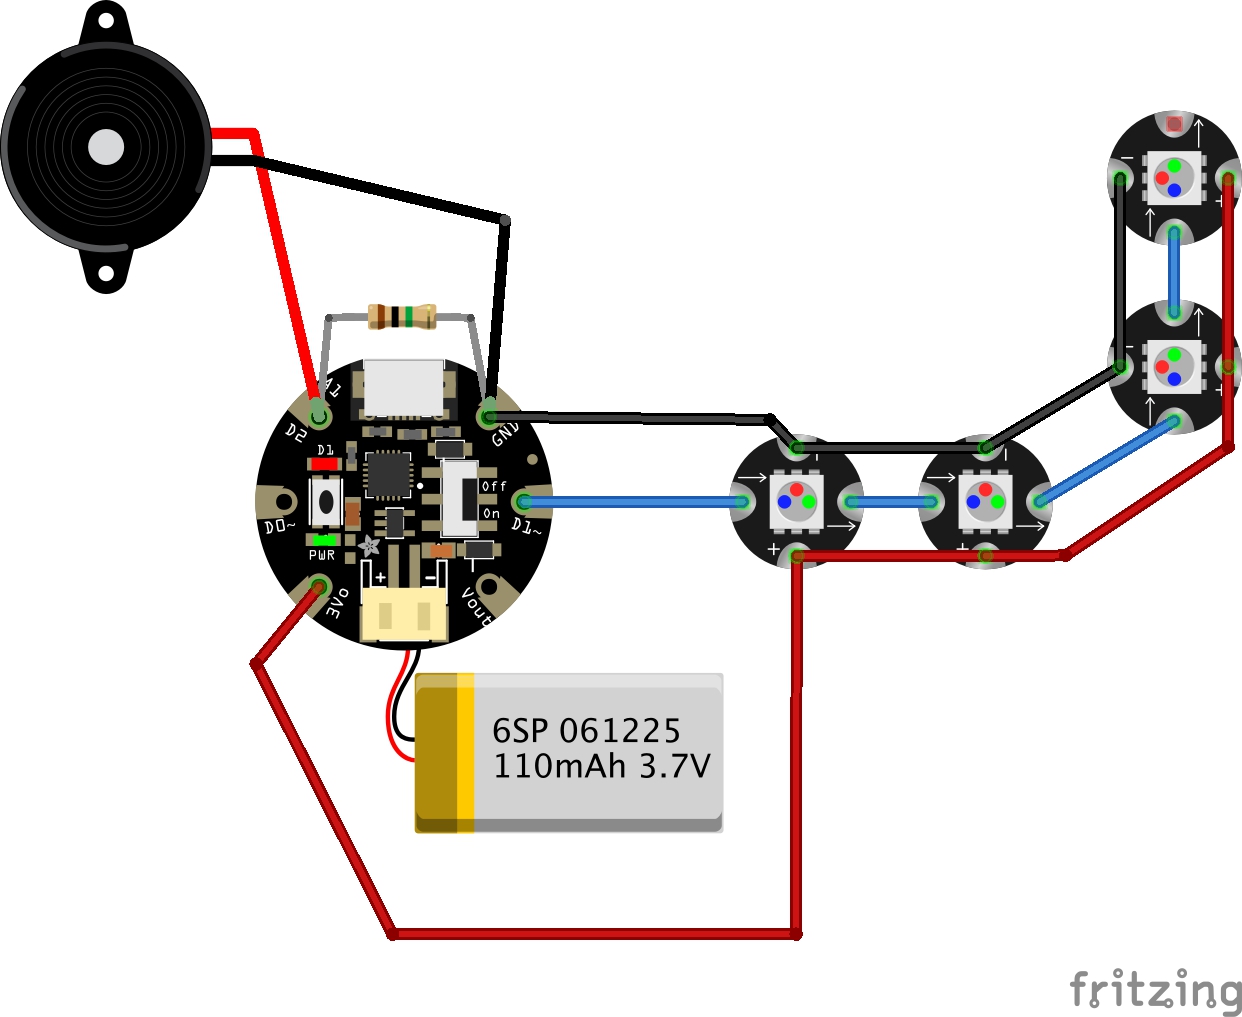
Our idea was to create a wireless filter box. I wanted to use some of the nrf240l1 radio modules I have acquired as they provide a very cheap mechanism for wireless communication, and there are lots resources available to make them work with Arduino. A detailed tutorial on using Arduino + Nrf24l01 running into Max/MSP software can be found on my website here

Discussing the box!

We discussed:

The wooden boxes I had purchased and selected a small oval shaped one as the best shape and size to fit in the hand. 

Buttons- having some (x2) to enable more functionality- options included click buttons that would provide tactile feedback when depressed or valve style that would more naturally mimic an interaction with an instrument such as a trumpet, like a valve, these would give feedback not as obviously as a click but more suited the instrument paradigm. 

Adding a force sensitive resistor (FSR) that could then be pressed harder or softer to achieve some of the effects you would with other instruments such as when fretting a guitar, and allow expression through fingertip movement and pressure of the hand on the box. The mapping of the FSR could then be naturally connected to something like the amplitude of the sound so when pressed harder the sound would be louder, again going with what a player might naturally expect from an interaction of that style. 

Light dependent resistor (LDR) this worked well as a mechanism to control some sort of filter, or for example the mute of a trumpet, the cutoff frequency of the sound or the volume. This is taking the movement of the opening and connecting it to any kind of parameter that might need fine movement and can be used to get effects like vibrato and tremolo. A parallel can also be drawn between something like scratching (dj style) by opening and closing the lid, and when connected to a filter controlling some element of feedback, using noise as the sound generator. We had a little play with using the light dependent resistor to control the cutoff frequency on a filter over sounds and using the motion to trigger MIDI notes but felt that the latter did not really play into the strengths of the opening and closing of the box as much as the controlling of an effect. 

The aim with the filter box was to create something that when held in a natural position would allow access to the 2 buttons and the FSR as well as facilitating the opening and closing of the lid so that the elements could be used in conjunction with each other and separately in an ergonomic way. 

The Pressure Box

We discussed the pressure box and using an array of piezos arranged around the bottom of the circular wooden box to create 8 potential pressure points. The Arduino pro mini we are using in the instruments allows for 8 analogue inputs so would suit this set-up. The box can then be filled with foam and topped with a soft tactile yet spongy material such as neoprene, or potentially some sort of skin stretched over the top in the style of a tambourine and secured down with pins. Being that the piezos are very sensitive to vibration there may be some cross talk between the 8 units but this could provide useful for expression. The sensitivity of the piezos allows for tapping the box to trigger or modulate the sound also. 

Future boxes

The hexagonal box though not used yet could potentially feature a new mode of interaction for each of its faces to allow a player to choose their preferred interaction mode and mechanism, this may be one for future exploration.

Next Steps

I will now review what we have discussed and implement them into some more prototypes! 

Underfoot Show - Threeways School, Bath

 Last week we had the "AboutNOWish" team come in to perform their interactive sound and movement piece "Underfoot" at Threeways. They took over the Sensory Studio for three days and worked with several students and I can not praise their work highly enough. Not only were the students inspired and very obviously joyfully engaged, but the staff too. Since the departure of the team the school has been buzzing with people collaborating to build on that creative energy and replicate some of the fantastic work that went on. 

 The piece made use of 3 large pieces of layered textural matting (grass, pink squashy matts and blue fluff), 3 dancers, a musician/technician, some underfloor bespoke pressure sensors and custom built software (made in Supercollider). Each texture had its own sound/music and movements and between each the flooring was rolled back to reveal the next layer. The dancers used intensive interaction techniques with plenty of individual attention and eye/body contact to encourage the students to join in with the movements, no talking was used. The students responded magnificently, even some with quite challenging behaviour, and were obviously very engaged. The musician/technician supported with large whistle and saxophone accompanied by a subtle electronic soundtrack managed by the software and a discrete controller. Some electronic sounds triggered by the sensors provided a nice random element to the sound too. The instrument playing also became part of the performance as the musician moved onto the mat and interacted with students and did a very good job of playing with a child's arm down the front of the saxophone on several occasions. This type of use of resonant surfaces for tactile sensations often has a great effect on several of our students. 

 The technology employed was inspired in its subtlety, effectiveness and flexibility. Although the sensors provided a great element to the piece, the students were mostly unaware of their existence. The electronic music was subtle and provided a great backing, mood and depth for the live playing that was going on and I felt that had the technology crashed then the piece could have still carried on without major issue. The team seemed well practiced in getting in and out of installations and the kit seems robust and quick to set up.  For its use at Threeways in the Studio we decided to patch it into the lighting so that the pressure sensors could also control spots of light over the sensors which was nice to explore. 

 The team were a lovely bunch of people and very sensitive to the needs of the school, I would highly recommend this performance and indeed we hope to find another opportunity to work with them again. We have received many testimonials from staff and parents as to the effectiveness of the sessions. 

Working with eTextiles

Today at Threeways School we met with some Bath Spa University art students to discuss a project that looks to explore eTextiles. We will be working towards an installation that will be explored by the children and young people at Threeways in the Sensory Studio in March. I wanted to rig up a demo that made use of conductive thread and a micro controller designed for wearable projects so I ordered an Adafruit Gemma (essentially a wearable Arduino) and some sewable Neopixels and went on the fantastic Adafruit website to look at the wearable projects for inspiration. 

I found this tutorial for a pixie dust bag which would require minimal sewing and would be easy to put together for a demo. I only had 4 flora LED pixels, but I figured this would be fine. I also didn't want to use a capacitive sensor, but instead wanted users to have to squeeze the bag to change colour. The bag can be held in the hand and it is good dextrous exercise for some of our students to squeeze objects like this so was a nice example. I could have used a force sensor, or made one from velostat, but I opted for using a piezo as it is cheap and ready to use. One of the Arduino examples in the 'Sensors' section is for a knock sensor using a piezo, this would be the basis of my input and I simply needed to swap out the capacitive sensor input and put this in. As the example code says, the circuit is simple too: 
    * + connection of the piezo attached to analog in 0
    * - connection of the piezo attached to ground
    * 1-megohm resistor attached from analog in 0 to ground

Parts:

Adafruit Gemma - £7.26

Flora RGB Neopixels - £7.19

Conductive Thread - £3.88 (you can use wires instead to be honest and it would be easier and cheaper if like me you prefer soldering to sewing! As long as you use flexible wire and avoid brittle single core stuff it should last for a while, though may end up snapping eventually.)

Small Piezo - £1.36

A small Lithium Ion Battery - £7.22 (you will need a special LiPo charger too, beware that chargers are often aimed at either above or below 500mAh batteries, though may be adaptable. Check your battery and match it to something suitable.)

1 megaohm resistor

Some cushion foam and a cotton drawstring bag

Total cost is around £20 

Circuit:

The parts were assembled between rectangles of the cushion foam with the LEDs stitched into the middle layer. The piezo element was covered in electrical tape to stop the metal touching the conductive thread (remember it is pretty much like bare wire so don't let it touch things it shouldn't!), and layered underneath the battery and Gemma board. The final assembly was then put into a little cotton bag. 

I made sure to use crocodile clip test leads to check the hardware before I wired it up for real and tested each component as it was sewn in. The thread I used really needed clear nail varnish painting on the knots as soon as you have tied it off to stop them coming undone, but the one I have linked above says it is rough so ties up better. You could also stuff the bag with something smelly and maybe a vibration motor for a true multi sensory experience!

Final code:

//Luke Woodbury 4/11/15 dotLib.org
//Use Piezo as pressure sensor inside squashy foam filled bag
//to trigger colour change in LED animation
//Code based on:
// - NeoPixie Dust Bag by John Edgar Park jpixl.net
// - Adafruit GEMMA earring code and Adafruit NeoPixel buttoncycler code
// - Arduino knock sensor example


#include <Adafruit_NeoPixel.h>  //Include the NeoPixel library

#define NEO_PIN 1        // DIGITAL IO pin for NeoPixel OUTPUT from GEMMA
#define PIXEL_COUNT 4   // Number of NeoPixels connected to GEMMA
#define DELAY_MILLIS 10  // delay between blinks, smaller numbers are faster 
#define DELAY_MULT 8     // Randomization multiplier on the delay speed of the effect
#define BRIGHT 100        // Brightness of the pixels, max is 255

// Parameter 1 = number of pixels in strip
// Parameter 2 = pin number on Arduino (most are valid)
// Parameter 3 = pixel type flags, add together as needed:
//   NEO_RGB     Pixels are wired for RGB bitstream (v1 FLORA pixels, not v2)
//   NEO_GRB     Pixels are wired for GRB bitstream, correct for neopixel stick (most NeoPixel products)
//   NEO_KHZ400  400 KHz bitstream (e.g. FLORA pixels)
//   NEO_KHZ800  800 KHz bitstream (e.g. High Density LED strip), correct for neopixel stick
Adafruit_NeoPixel pixels = Adafruit_NeoPixel(PIXEL_COUNT, NEO_PIN, NEO_GRB + NEO_KHZ800);

//Piezo bits
#define knockSensor 1 // the piezo is connected to analog pin 1
const int threshold = 50;  // threshold value to decide when the detected sound is a knock or not
int sensorReading = 0;      // variable to store the value read from the sensor pin

int showColor = 0;    //color mode for cycling

void setup() {
  pixels.begin();
  pixels.setBrightness(BRIGHT);
  pixels.show();                //Set all pixels to "off"

  //pinMode(knockSensor, INPUT);
}


void loop() {
   
  int RColor = 100; //color (0-255) values to be set by cylcing touch switch, initially GOLD
  int GColor = 0 ;
  int BColor = 0 ;
  
       if (showColor==0) {//Garden PINK
         RColor = 242;
         GColor = 90;
         BColor = 255; 
       }
       if (showColor==1) {//Pixie GOLD
         RColor = 255;
         GColor = 222;
         BColor = 30; 
       }
       if (showColor==2) {//Alchemy BLUE
         RColor = 50;
         GColor = 255;
         BColor = 255; 
       }
       if (showColor==3) {//Animal ORANGE
         RColor = 255;
         GColor = 100;
         BColor = 0; 
       }
       if (showColor==4) {//Tinker GREEN
         RColor = 0;
         GColor = 255;
         BColor = 40; 
       }
  
  //sparkling
  int p = random(PIXEL_COUNT); //select a random pixel
  pixels.setPixelColor(p,RColor,GColor,BColor); //color value comes from cycling state of momentary switch
  pixels.show();
  delay(DELAY_MILLIS * random(DELAY_MULT) ); //delay value randomized to up to DELAY_MULT times longer
  pixels.setPixelColor(p, RColor/10, GColor/10, BColor/10); //set to a dimmed version of the state color
  pixels.show();
  pixels.setPixelColor(p+1, RColor/15, GColor/15, BColor/15); //set a neighbor pixel to an even dimmer value
  pixels.show();

  //piezo check
   // read the sensor and store it in the variable sensorReading:
  sensorReading = analogRead(knockSensor);

  // if the sensor reading is greater than the threshold:
  if (sensorReading >= threshold) {
      showColor++;
      if (showColor > 4)
        showColor=0;
       }   
  }

Designing electronic instruments

At Dotlib we are always looking for new and interesting ways to interact with sound. We have been developing some ideas for new instruments for the electronic orchestra at Threeways School that allow people to play with sound whilst following a few design rules, what we want is:

  • A focus on natural interaction, i.e. form affirms function and in this vein we talked about the opening and closing of a box to control a filter
  • Instruments that do not involve pressing on flat glass like a tablet screen, we want something more tangible
  • Preferably some local feedback in the form of vibration
  • Objects that are nice to hold and feel, perhaps finished in wood with a nice varnish like a traditional stringed instrument
  • As we need to focus on accessibility we need to consider not depending on finger dexterity
  • We want to provide an instrument that really offers a chance for the player to express them self
  • We need to tread the line with offering the user control over the creative process, whilst enabling the orchestra as a whole to play cohesively - the real challenge!  

We have been looking at a couple of initial ideas for development in terms of the outer casing of the instruments and the inner gubbins that make it work. They are the ‘filter box’ and the ‘pressure box’.


Filter Box

 A box that can sense how much it is open and link to a filter in an electronic instrument. 

A nice wooden box with a hinged lid that operates very smoothly. We have been looking at what type of box might be suitable and hinges that are robust and pleasing to open, and also what kind of sensor components would give the right kind of response. Thoughts so far include:

  • LDR (light dependent resistor) on the inside so that as the lid is opened, the amount of light hitting the sensor changes the filter, this is a affordable option as this component is cheap to purchase but the problem comes when trying to calibrate the sensor as ambient light levels can change  during a performance and in different environments. 
  • Flex sensor against the inside of the lid so that as the lid is closed the flex sensor is compressed. Flex sensors cost around £7 each so not as affordable as the LDR but does not have to be calibrated as they should always give the same reading. Homemade flex sensors can be made extremely cheaply as seen in this instructable, we have some ready made from a previous project that we will trial in this instrument which follow a similar set-up but use anti-static foam at the centre.
  • Stretch sensor attached between the bottom and the lid of the box, this would give readings when stretched open and could be used as a nice string to pull the lid closed to give tactile feedback. 
  • Magnet on the lid and hall effect sensor inside so that as the magnet moves away the sensor returns to the base value. 

We will have to do some small prototypes to figure out the cheapest and best way to create this box!


Pressure Box

A deformable surface, think tambourine but with a stretchy skin that can then be pushed into to create or manipulate sound. There are a couple of places the inspiration for this has come from, the first is the pads on the Alphasphere and the second is the Firewall. We are still looking to have the wooden outer to hold but perhaps in a circular shape. Options for the sensor include:

  • Electronic force sensor
  • Air pressure sensor (this would require a sealed box)
  • Cheap DIY force sensor
  • Distance sensor placed underneath the skin

We will be developing and testing from these initial ideas and will connect those blog posts related to that to here so you can keep up to date with the progress on these new instruments for musical expression!

Art Installation - Threeways School, Bath

This week saw an art installation in the Sensory Studio at Threeways School. This was a collaboration between degree art students at Bath Spa University and Threeways secondary students under Lucy Knibb's direction. We helped with the formation and installation of the piece and added a few electronics and lighting. We also used the surround speaker and projection system in the studio to rotate some audio recordings and visuals of the creation of the piece.

This was a great project to be part of and the students involved were rightly very proud of the outcome.