Exercise 3 - 7 segment displays and the 'switch case' statement
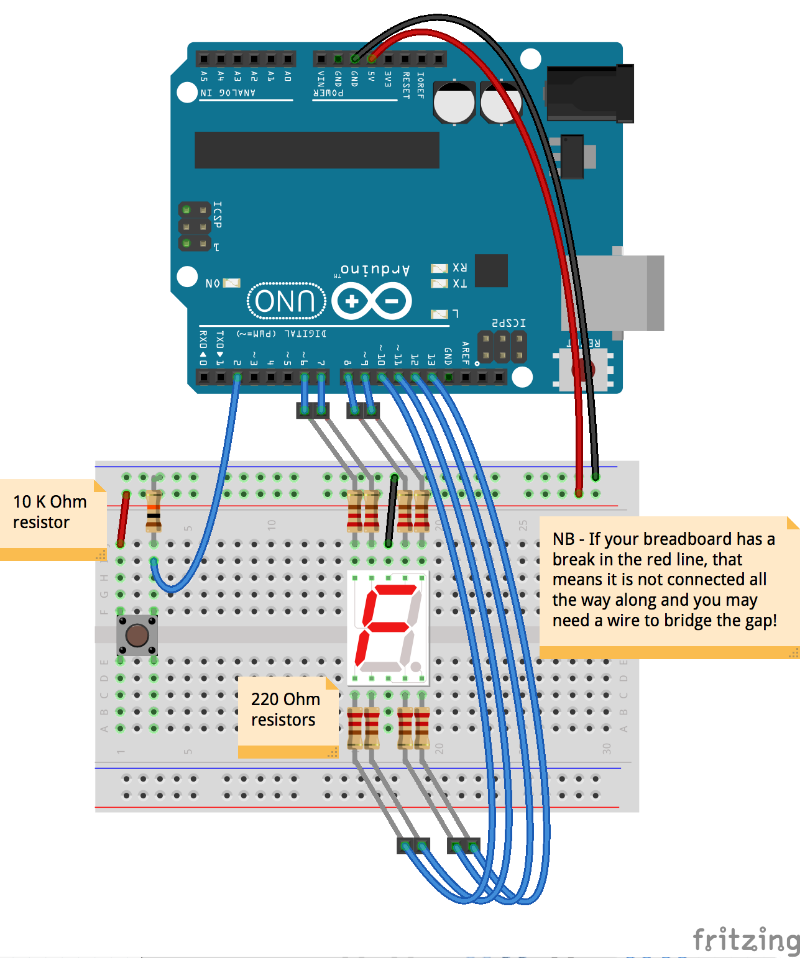
- The small lines in the 7 segment display above show you how the pins are connected, the image below shows how numbers are displayed using a 7-segment display:

- Paste the code below into the Arduino IDE and follow the instructions:
/* This code looks at using a 'switch... case' statement to control a
 *  7 segment display used for displaying numbers and letters.
 *  The full circuit has been given to you, but there is a fair bit of stuff
 *  to add to the code. Everything you need is here, but you will need to
 *  do some duplication and changing of names/numbers.
 *
 *  Look at the Arduino site reference page and the description of
 *  the 'switch case' statement under the 'Structure' section.
 *  https://www.arduino.cc/en/Reference/HomePage
 *  Also look under the functions section and find 'Random Numbers';
 *  look at the 'random' function to see how we use it in the code below.
 *
 *  We want to use this structure to control our display like a digital
 *  die in the following way:
 *  - if the button is pressed...
 *  - flash the dot a few times...
 *  - display a random number between 1 and 6
 *
 *  The code currently does this, but only with a 1 and a 4, it needs finishing!
 *  Create the code to show numbers 2, 3, 5 and 6 too with reference to the circuit
 *  diagram that shows what pin is connected to what LED bar on the display.
 *  You will need to create code in the declarations, the setup, the main loop and make
 *  some extra 'void' functions like those existing underneath the main loop. The code is
 *  heavily commented and should help you work out what does what. If it is not working,
 *  then follow the clues in the error messages and see if you can fix it!
 *
 *
 *  Luke Woodbury 6th April 2016
*/

//our declarations...
const int buttonPin = 2;  //const(ant) to hold the button pin number
int buttonState = 0;  //variable to hold the button state

const int midHoz = 6; //const(ant) to hold middle horizontal LED pin number
const int topLeft = 7;  //const(ant) to hold top left LED pin number
const int topRight = 9; //const(ant) to hold top right LED pin number
const int botRight = 12; //const(ant) to hold bottom right LED pin number
const int dotPin = 13;  //const(ant) to hold dot LED pin number

int choose;   //variable to hold our random number


void setup() {
  //setup code runs once
   pinMode(midHoz, OUTPUT);  //set up our LED pins as outputs
   pinMode(topLeft, OUTPUT);
   pinMode(topRight, OUTPUT);
   pinMode(botRight, OUTPUT);
   pinMode(dotPin, OUTPUT);

   pinMode(buttonPin, INPUT); //set up our input pin for the button
}

void loop() {
  //main loop runs repeatedly, very fast!
  buttonState = digitalRead(buttonPin); //read the button pin and store state in variable

  if (buttonState == HIGH) {  //if the button is pressed
    choose = random(1, 3);  //create a random number between 1 and 2 to store in the 'choose' variable,
                            //the higher number is 'exclusive',
                            // i.e. we need to set it one higher than we want
    dot();  //run the dot function as outlined below in 'void dot()'

    switch (choose) { //start the switch function using our random number to select a case
    case 1:   //case 1
      one();  //run the one function as outlined below in 'void one()'
      break;  //quit the switch function
    case 2:   //case 2
      four(); //run the four function as outlined below in 'void four()'
      break;  //quit the switch function
     }
   }
}

/* Below are our custom functions we have created, i.e. they are outside
 * of our main setup and loop, but we can use them from the main loop, or
 * indeed other functions just by calling their name.
 */

void allOff(){  //function to turn all LEDs on display off
  digitalWrite(midHoz, LOW); //set pin 6 LOW, i.e. off, GND etc
  digitalWrite(topLeft, LOW);
  digitalWrite(topRight, LOW);
  digitalWrite(botRight, LOW);
  digitalWrite(dotPin, LOW);
}

void one(){ //function to display number 'one'
  allOff(); //first turn all LEDs off with the 'allOff' function above
  digitalWrite(topRight, HIGH);  //set pin 9 HIGH, i.e. on, +5V etc
  digitalWrite(botRight, HIGH);
}

void four(){  //function to display number 'four'
  allOff(); //first turn all LEDs off with the 'allOff' function above
  digitalWrite(midHoz, HIGH);  //set pin 6 HIGH, i.e. on, +5V etc
  digitalWrite(topLeft, HIGH);
  digitalWrite(topRight, HIGH);
  digitalWrite(botRight, HIGH);
}

void dot(){ //function to flash the dot on our display 3 times
  allOff(); //first turn all LEDs off with the 'allOff' function above
  digitalWrite(dotPin, HIGH); //set pin 13 HIGH, i.e. on, +5V
  delay(100);             //wait for 100 milliseconds
  digitalWrite(dotPin, LOW);  //set pin 13 LOW, i.e. off, GND etc
  delay(100);
  digitalWrite(dotPin, HIGH);
  delay(100);
  digitalWrite(dotPin, LOW);
  delay(100);
  digitalWrite(dotPin, HIGH);
  delay(100);
  digitalWrite(dotPin, LOW);
  delay(100);
}
Extension exercises
- Instead of flashing a dot 3 times, try animating some tumbling numbers
- Try using the display to animate something more abstract on button presses
- Add numbers 0, 7, 8 and 9 to the code
Click on a link